1. Preparing the paper
1.1. Download the template (Word or LaTeX)
1.2. Download and install custom fonts
1.3. Write the paper2. Submitting the paper
2.1. Logging-in / creating an account
2.2. Selecting the Track
2.3. Registering the paper
2.4. Uploading the PDF file
2.5. Adding co-authors
2.6. Updating the paper after submission
▢ Introduction
Please read the following instructions carefully. These contain information that will help you correctly prepare and submit your paper for the conference. If you face any issue when submitting your paper, please ensure that you have followed the instructions on this page. If the issue persists, contact us at icegov@icegov.org.
All papers submitted to the conference within the submission deadline will undergo the following 4-step process:
- Plagiarism screening.
- Double-blind peer review by the Programme Committee (2 reviews per paper).
- Analysis of all papers in each Track by the respective Chairs for tentative list of accepted / rejected papers within the Track.
- Confirmation of accepted / rejected papers by the Programme Committee Chairs.
All authors will be notified about the decision of their paper, together with the reviews and other useful information, by the paper decision notification deadline. Papers which are desk-rejected during step 1 (plagiarism screening) will be notified straight away. Further instructions on how to prepare the final version of the paper will be available then.
▢ 1. Preparing the paper
1.1. Download the template (Word or LaTeX)
To prepare your paper, start by downloading the ACM Master Article Template. Two formats are available: Microsoft Word (DOCX) and LaTeX. You can choose the format that you are most comfortable with and ACM provides specific instructions for each (see links below). Do not use templates from previous ICEGOV conferences or from other conferences. Should you have any questions or issues while dealing with the template, please contact ACM’s support directly at acmtexsupport@aptaracorp.com.
→ Microsoft Word: download the Submission Template – Microsoft Word (Review Submission Format). Follow the embedded instructions to apply the paragraph styles to your various text elements. The text is in single-column format at this stage and no additional formatting is required at this point.
→ LaTeX: download the Primary Article Template – LaTeX to create your article submission. Use the “manuscript call” to create a single column format. Please review ACM’s LaTeX best practices guide should you have any questions.
1.2. Download and install custom fonts
To ensure that the template works correctly (either format), you will need a set of custom fonts installed on your computer: Linux Biolinum and Linux Libertine. Both are open source fonts and can be downloaded below. Instructions on how to install custom fonts for Windows and MacOS are available in the file how-to-install.txt within the package.
![]()
Download the custom fonts package
1.3. Write the paper
When writing your paper, please bear in mind that it must be written in correct English, follow general academic standards and a proper structure, the latter depending on the paper category (research, ongoing research or short). More information about each paper category is available here.
Papers submitted to the conference must be original work, not published nor accepted for publication or in review elsewhere. Likewise, the paper must be submitted in a “blind” mode, that is, the paper does not contain the name, email address, affiliation or any information / acknowledgements / references that could potentially reveal the identity of the author(s).
▢ 2. Submitting the paper
The EDAS Conference and Journal Management System is the platform used by the conference to submit and review all papers. No other means of submission are allowed. In order to submit a paper, first you need to login to EDAS or create an account if you do not have one yet.
2.1. Logging-in / creating an account
If you already have an EDAS account, clicking here will take you to the conference submission page. Insert your username and password; if you have forgotten your login details, click on reset your password and follow the on-screen instructions.
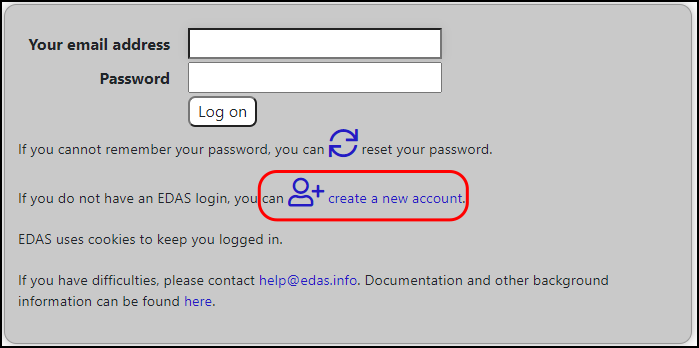
If you do not have an EDAS account, you will need to create one. The process is very similar to registering for any other website with user accounts. Note that a university, corporate or government email address will work better, as general email addresses may delay the creation of the account (e.g. Gmail).
- On the login screen, click on create a new account (image 1), which leads you to the user profile page.
- On the user profile page you need to provide some personal details and agree to EDAS’ privacy policy. Please make sure this data is correct, as it is used throughout the whole conference; any typos inserted now will be carried over.
- When you submit your information, if there is already an account with a similar name, you may see a list of candidate user names. Check whether your name is already in the list; if yes, use that account. Having multiple EDAS accounts is likely to lead to confusion, such as mis-assigned reviews or papers that are “missing”.
- Once you check the box This is not a duplicate and click on Add this person, the system checks whether it can reach your email address and sends you a password link by email. This ensures that the email address is working and that you can receive emails from EDAS. Usually, the password reset email arrives within a minute or two. Follow the instructions provided.
2.2. Selecting the Track
Tracks are thematic clusters for the papers. It is very important that you select the most appropriate Track for your paper, as this will impact its reviews. Please read each track description carefully and what kind of papers are accepted. Once you have made your choice, click on the track name to select it.
2.3. Registering the paper
In this section you are required to fill the metadata of your paper for it to be registered in EDAS (image 2).
- Title (include the subtitle here, if any)
- Keywords (3-8)
- Abstract (150-300 words)
- Language (only variants of English are available)
- Category (categories are track-specific, e.g. Track 12 only accepts short papers)
- Add yourself as author (check this box if you are the first author of the paper; you can add more authors later)
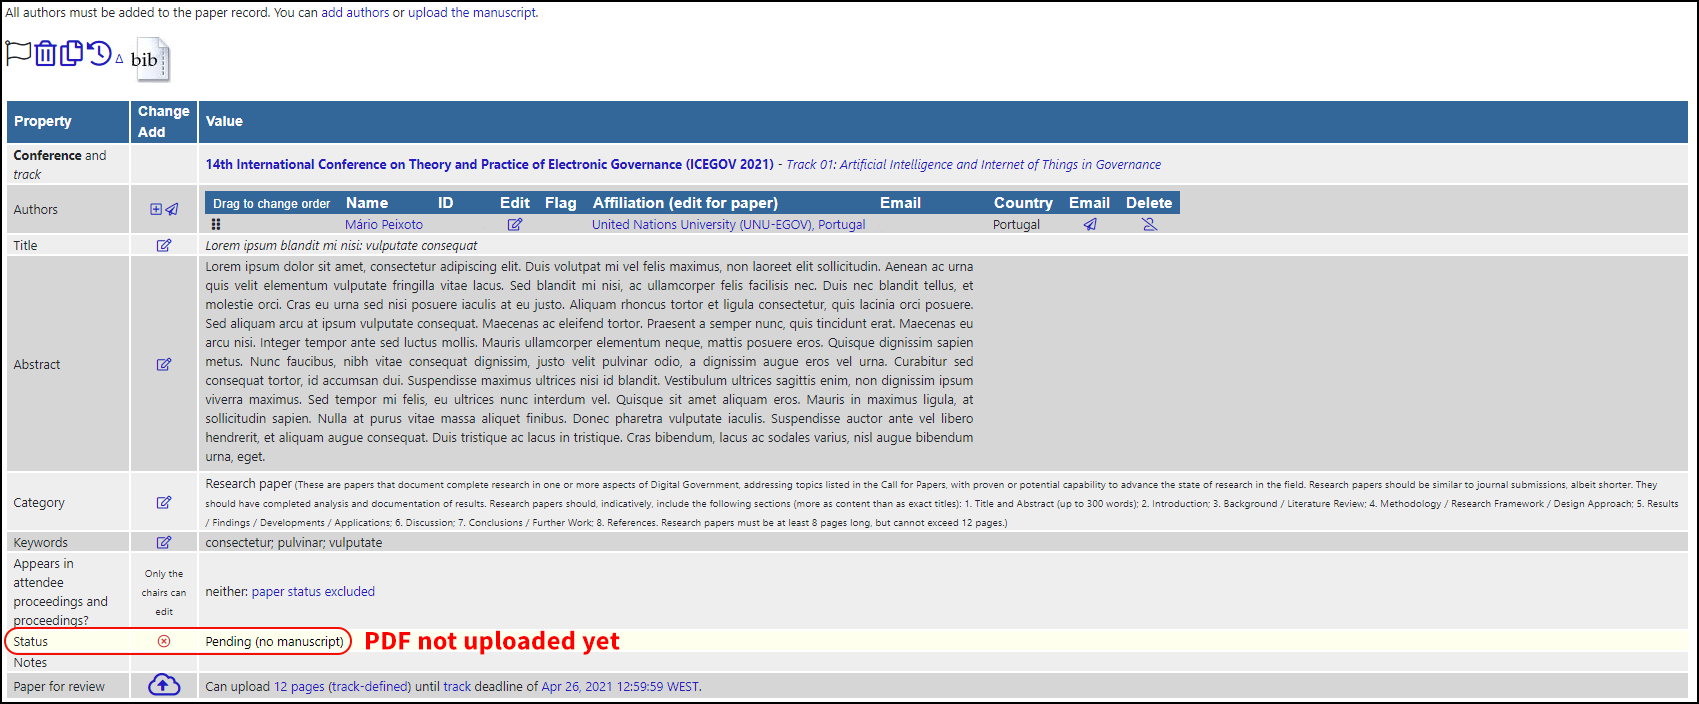
Click on Submit once all the data is filled and you have accepted the policy. You will see a new page with the details of your registered paper (image 3). Note that the paper status at this time is Pending (no manuscript). This means that you have not yet uploaded the PDF file. You will receive an automatic email from EDAS after performing this step.

2.4. Uploading the PDF file
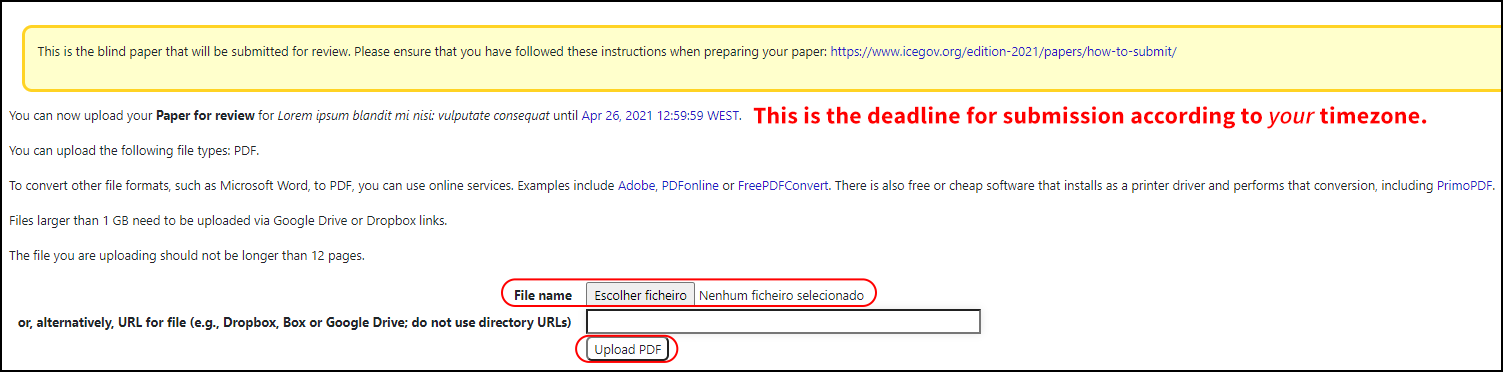
After the previous step, scroll down until you see the option to upload the paper in PDF. Note that the deadline for submission is already converted to your current timezone. Submissions past this date are not allowed. Select the PDF file from your computer and click on Upload PDF (image 4).
EDAS will automatically check a few things on the document, including size (US letter) and page length. If you have not changed the paper template nor gone past the page limit, the upload should be successful and EDAS will display the message in image 5. Note that the paper status has changed to Active (has manuscript) (image 6). If there are errors with your paper, please fix them before resubmitting it. You will receive an automatic email from EDAS after performing this step.
You can upload an updated version of the paper at any time up to the submission deadline by clicking on the cloud icon next to Paper for review (image 6). Do not register a new paper in EDAS if you just need to update the PDF file. This can lead to desk-rejection.


2.5. Adding co-authors
To add co-authors, go to the paper page and click on the plus sign next to Authors (image 7). A new page will appear where you can search for the co-author profile. Ideally, each co-author is registered in EDAS. A list of relevant profiles will appear after your search. Select the right one and click on Select this person (image 8).
If your co-author is not listed because he/she is not registered in EDAS, you can add him/her manually by clicking on None of the above (image 8) and following the on-screen instructions. A confirmation page will appear and you can continue adding co-authors this way. You will receive an automatic email from EDAS after performing this step. Do not add authors who have not significantly contributed to the paper; each author is limited to 5 submitted papers (3 as first author).


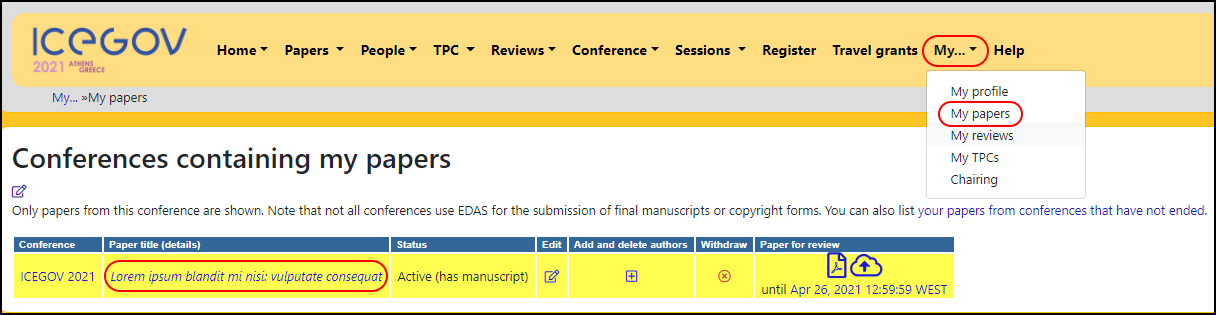
2.6. Updating the paper after submission
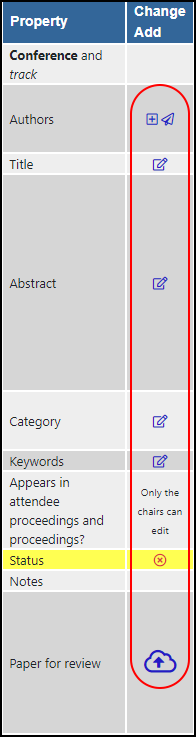
You can edit the paper details up to the submission deadline. To do this, login to EDAS and on the top menu click on My.. My papers (image 9). Select the paper you want to edit. The column Change value (image 10) allows you to edit that field. Note that some fields cannot be edited by authors (e.g. paper status). You will receive an automatic email from EDAS after performing this step.